Neat Image user guide / Filtration process details / Stage III. Adjust filter settings Adjust filter settings (Advanced mode)
As compared with the Standard mode (see the Adjust filter settings (Standard mode) subsection), the Advanced mode offers a more sophisticated set of filter controls. There are also two filters - noise reduction filter and sharpening filter - but these have more settings now. Please follow the guidelines below to adjust both filters.
Adjusting noise filter settings in Advanced mode
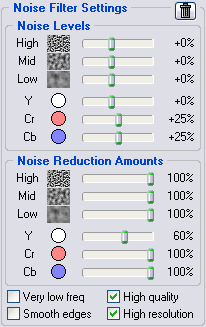 In the Advanced mode, the noise filter has separate settings for all frequency and channel components of the input image. There are pairs of noise level - noise reduction amount controls for each of these image components. The meaning of each noise level - noise reduction amount pair is the same as that explained in the Adjusting noise filter settings in Standard mode: a noise level determines which image elements are considered noise in the corresponding image component; a noise reduction amount determines how much reduction is applied to the image elements identified as noise in the same component.
Because the noise level controls are relative to the device noise profile, their defaults usually produce good results when the noise profile is accurate:
Use the Profile quality and match indicators in the bottom of the Filtration Job Editor window to estimate the accuracy of the profile. The Profile quality indicator shows how accurate and complete the noise analysis is. The match indicator shows how closely this profile corresponds to the noise properties of the working image. Both indicators have to show high values for the noise reduction to be accurate.
The noise level defaults are 0% (some of the noise level defaults may be different from 0%), which means the noise levels are completely determined by the noise profile. When the level controls are set differently, the noise level estimations are raised or lowered accordingly. A noise level control can be in the range from -100%, which means no image elements are considered noise, and therefore, no noise reduction is applied in the corresponding image component; to +150%, which means noise reduction is applied to the image elements that are weaker than 250% of the noise profile's noise level.
Noise reduction amounts can be in the range from 0% (none of the detected noise is removed) to 100% (all the detected noise is removed). By default, the noise filter removes 100% of detected noise (some of the noise reduction amount defaults may be different from 100%).
Decreasing the noise reduction amounts can have a positive effect if the input image contains some natural noise. For example, when you filter images of asphalt, sand, or anything else that contains fine natural noise-like features, it may be helpful to reduce amounts down to 40-50% (also see Partial filtration for additional tips). Our experience shows that these values generally provide a good balance between preserving image details and noise removal.
We recommend disabling the sharpening filter when adjusting the noise filter. To disable the sharpening filter, uncheck all channels in the Sharpening Settings box.
Adjust noise reduction amounts (optional)
- Use the Noise Reduction Amounts: High, Mid, and Low; Y, Cr, Cb (R, G, B) sliders.
You can vary the noise reduction amount for each frequency and channel component of the input image. The higher a certain noise reduction amount, the more of the detected noise is removed in the corresponding image component. Be careful, setting the noise reduction amounts too high can lead to unnaturally looking (over-smooth, plastic-like) results. Too low amounts may be not enough to sufficiently remove the objectionable part of the noise. You have to balance the noise reduction amounts (most importantly, the amount of noise reduction in the Y channel) to get the result that looks best to your eyes.
| Comment |
| As human vision is not very sensitive to variations of colors, strong filtration in the Cr and Cb channels does not noticeably distort an image, but efficiently removes color noise. |
If the input image has only fine (high frequency) noise elements you may want to utilize only the high frequency filter and switch off the filters for other frequencies by setting their amounts to 0%.
| Noise samples of different frequency/size are shown in the Noise Filter Settings box. These are examples of grainy structures typically regarded as noise. |  |
Adjust additional filter settings (optional)
- If the input image contains strong low frequency noise then you may want to enable the very low frequency filter: check the Very low freq checkbox in the Noise Filter Settings box.
Smooth edges |
Off | On |
 |  |
- Check the Smooth edges checkbox to make edges and lines look smoother (see an example on the right).
- Check the High quality checkbox to enable the higher quality noise reduction filter. This will slightly slow down processing but will deliver the most accurate results in return. You may want to enable this option in the very end just before applying the filtration to the whole image.
- Check the High resolution checkbox to enable the higher resolution noise filter. This may be useful when processing images with very fine details that should be better preserved by the filter.
Use preview
- Use the preview when adjusting the noise filter settings.
After you have made changes to the noise filter parameters, do not forget to check the preview. Use the preview on different image areas to get a better feeling for the results of noise reduction.
Using the Auto recalculate preview option is recommended (see Filtration options).
If the noise filtration looks too strong then decrease the noise reduction amounts for the corresponding channels and/or frequency ranges . If the noise filtration is not sufficient then increase the amounts. Use the Component Viewer (see below) to determine image components that require adjustment.
Adjust noise levels (when necessary)
Usually it is not necessary to change the noise levels if the noise profile is accurate. You only have to adjust the noise levels if you see that some noise elements are not reduced even if you set the noise reduction amounts to 100%. Such residual noise elements are usually caused by an inaccurate noise profile providing inaccurate noise level estimations to the noise filter. This may be compensated by adjusting (increasing) the noise levels in the filter settings.
- Use the Noise Levels: High, Mid, and Low; Y, Cr, Cb (R, G, B) sliders.
The noise filter has access to three frequency components and three channel components of the input image. Corresponding sliders adjust the estimated noise levels for each of these components.
The higher a certain noise level, the more image elements in the corresponding image component are considered noise. Be careful, setting a noise level setting too high can lead to removal of important image details. Setting a noise level setting too low can lead to incomplete filtration: residual noise and compression artifacts can stay in the output image.
As a rule, if the device noise profile has been built properly, it is not necessary to increase the noise levels by more than 50%. If the input image contains strong surges of noise in the high frequency range, it is recommended to increase the high frequency noise level up to +20 to 40%.
If the input image contains strong color noise, it is recommended to increase the Cr and Cb noise levels to +30%. In some cases, it may be useful to increase these noise levels up to +100%.
If adjusting noise levels still does not help and some noise elements remain in the image, probably the device noise profile is not good at all. Return to Stage II. Prepare a device noise profile and additionally fine-tune the device noise profile or simply rebuild the profile from scratch.
Use Component Viewer (optional)
The Component Viewer (use
 to open it) is intended for detailed examination of both frequency and channel components of the image. Find more details about using this tool in the Component Viewer subsection.
Use Variant Selector (optional)
The Variant Selector (use
 to open it) is designed to compare several variants of filtration side-by-side to find the optimum filter settings easier and faster. More information about this tool is available in the Variant Selector subsection.
Use Image Viewer Adjustment (optional)
The Image Viewer Adjustments window (use  to open it) helps to adjust the image viewers of the Filtration Job Editor. You can operatively adjust the brightness and contrast of the viewers to better see the effect of noise reduction in an interesting image area (for example in a very dark part of the working image) easier and faster. More information about this tool is available in the Image Viewer Adjustments subsection.
Adjusting sharpening settings in Advanced mode (optional)
Note: You can skip this subsection when reading for the first time.
The sharpening filter is designed to increase image sharpness without increasing the noise strength.
The default values of the sharpening settings should produce satisfactory results (when sharpening is enabled for any of the channel components) but you are encouraged to vary the settings to find values that produce the desired level of sharpness. Zero sharpening amounts will not sharpen the image at all. The non-zero sharpening amounts will apply sharpening of the specified strength. Use sharpening controls for different frequency components to sharpen fine, medium or large image details. As with any other sharpening method, you have to balance the amounts to avoid over-sharpening.
Use the preview when adjusting the sharpening settings.
Select color channels where sharpening should be applied
 Use checkboxes in the Sharpening Settings box.
If the working color space is RGB, then all color channels should typically be processed. If it is the YCrCb color space (YCrCb or YCrCb Symmetric), then, usually, there is no need to sharpen the Cr and Cb channels.
Select sharpening mode
- Check the Conservative checkbox to enable more accurate sharpening, which produces much less halo effect around sharpened image details.
Adjust sharpening amounts
- Use the High, Mid and Low sliders in the Sharpening Settings box.
Specify how much sharpening should be applied to each frequency component of the image.
The standard sharpening settings used by many graphic editors are 100% for high frequency and 0% for medium and low frequencies (used by default).
Use preview
- Use the preview when adjusting the sharpening settings.
After you have made changes to the sharpening settings, do not forget to check the preview. Use the preview on different parts of the image to get a better feeling for the results of sharpening.
As soon as you are happy with the preview results regarding both noise reduction and sharpening, proceed to the subsection about saving the filter settings into a preset or directly to the Stage IV. Apply filter to the input image.