 When building a profile, you will mostly work with the Device Noise Profile tab in the Filtration Job Editor:
Neat Image user guide / Device noise profiles
In this subsection, you will find out how to build a single noise profile for an image produced in a certain shooting or scanning mode.
When building a profile, you will mostly work with the Device Noise Profile tab in the Filtration Job Editor:
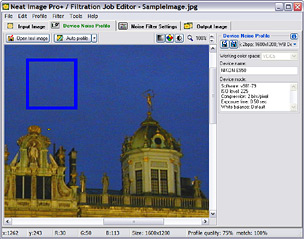
It is assumed that some input image is opened in the Filtration Job Editor.
Building a new noise profile generally consists of three stages:
Stage I. Building a profile;
Stage II. Documenting the profile;
Stage III. Saving the profile.
The Stage I. Building a profile can be done with the use of a regular image (for example, the image that you want to denoise in Neat Image or any other normal image) or with the use of the Calibration Target. These two cases are described as two alternative versions of the Stage I:
Stage I. Case of building a profile using a regular image;
Stage I. Case of building a profile using the Calibration Target.
You may want to follow the case of building a noise profile using a regular image if you only need a single-use profile to process one input image. In this case, the input image (or an alternative regular image from the same series that has to be produced by the same device working in the same mode) should contain enough uniform featureless areas for noise analysis.
A uniform area (with minor variation in all color channels of the image) may be overcast sky, clear sky (without clouds and birds), or any other part of an image, where there are no visually perceptible details (except the noise). Neat Image needs uniform featureless areas of around 100x100 pixels (minimum is 60x60 pixels).
If the input image does not contain such areas and you have no suitable alternative regular image that contains such areas, you can prepare a special test image and follow the case of building a noise profile using the Calibration Target. That is also recommended if you want to prepare a reusable noise profile for a certain mode of your camera or scanner.
Stage I. Case of building a profile using a regular image
Stage I. Case of building a profile using the Calibration Target